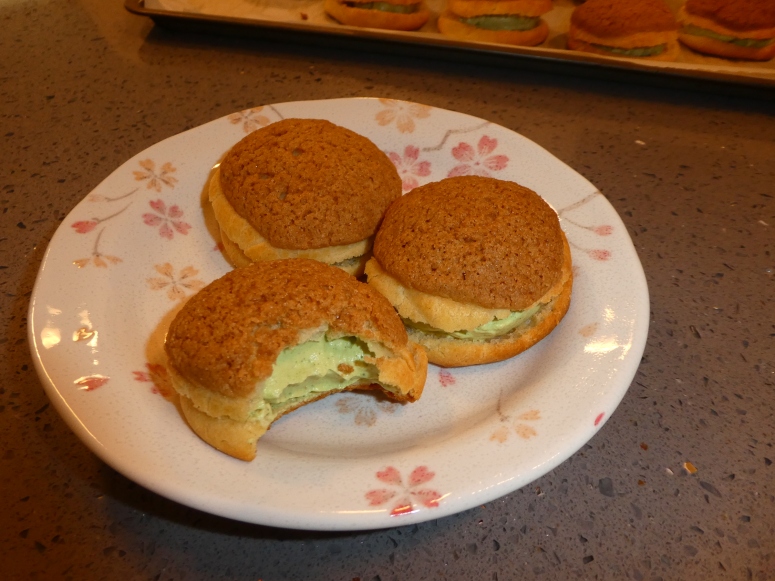
Matcha Cream Puffs

P1090532

These matcha cream puffs are amazing!  They have the perfect mix of sweetness from the craquelin tops and white chocolate, and bitterness from the matcha green tea.  They do take a while to make, so I recommend splitting the components over multiple days.


Matcha Cream Puffs
From Pastry Love

Yield: 32 cream puffs

For the filling:

For the craquelin tops:

  • 1/2 cup light brown sugar
  • 4 tablespoons unsalted butter, at room temperature
  • 1/2 teaspoon vanilla extract
  • 1/4 teaspoon kosher salt OR just under 1/4 teaspoon table salt
  • 1/2 cup all-purpose flour

For the puffs:

  • 1/2 cup unsalted butter
  • 1 tablespoon sugar
  • 1/2 teaspoon kosher salt OR just under 1/2 teaspoon table salt
  • 1 cup water
  • 1 cup plus 1 tablespoon all-purpose flour
  • 4 large eggs, at room temperature


Make the filling at least 1 day and up to 3 days in advance:

  1. Make the filling.

Make the craquelin up to 1 month in advance:

  1. In the bowl of a stand mixer fitted with the paddle attachment, stir together brown sugar, butter, vanilla, and salt.  Beat until well combined.
  2. Add flour and beat until all of it is mixed in and you have a firm dough.
  3. Cover with plastic wrap and chill in fridge for 15-20 minutes.
  4. Generously flour a work surface and shape the dough into a log that is 1 1/2 inches in diameter.
  5. At this point, you can store the dough in an airtight container in the fridge for up to 2 weeks or in the freezer for up to 1 month.  Defrost overnight in fridge before use.
  6. Slice log into 32 1/4-inch slices.
  7. Place slices on a flat plate or baking sheet lined with parchment or wax paper.

Make the puffs 4 days to 1 month in advance:

  1. Place racks in the center and bottom third of the oven and preheat to 400°F.  Butter two baking sheets or line them with parchment paper and set aside.
  2. In a medium saucepan, heat butter, sugar, salt, and water over medium heat until butter is melted.  Do not let mixture come to a boil, or the water will evaporate.
  3. Add flour all at once and stir with a wooden spoon until flour is fully incorporated.  The mixture will look like stiff pancake batter.
  4. Keep stirring vigorously over medium heat.  The mixture will slowly become stiffer and look more like loose dough.  It will lose its shine and become more matte.  Stir continuously for 3-4 minutes, or until the dough starts to leave a film on the bottom of the pan.
  5. Remove dough from heat and place in the bowl of a stand mixer fitted with the paddle attachment.  Mix dough for 1 minute on medium-low speed to allow some of the steam to escape and to cool the dough slightly.
  6. Crack eggs into a small pitcher or liquid measuring cup and whisk to break up yolks.
  7. With mixer on medium-low speed, gradually add eggs to dough.
  8. After all the eggs are added, turn mixer up to medium and beat for 20 seconds, until dough is glossy, shiny, and soft, like gluey mashed potatoes.
  9. Spoon dough into a pastry bag fitted with a 1-inch round tip or cut the corner so the hole is about 1 inch in diameter.  Pipe out round puffs onto the baking sheets about 1 1/2 inches in diameter, spacing puffs a few inches from each other.  Alternatively, you can spoon the dough in mounds on the baking sheets.
  10. Place a craquelin top centered directly on top of each puff.
  11. Bake for 15 minutes without opening the oven door, or until the puffs have expanded and started to turn golden brown.
  12. Turn oven down to 325°F.  Bake for another 20-30 minutes, rotating the baking sheets and switching them between the top and bottom racks after 10-15 minutes.  At the end, the puffs will be entirely golden brown, like honey.
  13. Remove from oven and cool on the baking sheets on a wire rack.
  14. At this point, unfilled puffs can be stored in an airtight container at room temperature for up to 4 days or in the freezer for up to 1 month.  Refresh in a 300°F oven for 3-4 minutes if at room temperature, 8-10 minutes if frozen, then let cool again.

To assemble cream puffs:

  1. Make sure puffs are completely cool.
  2. Poke a hole in the bottom of each with a chopstick or the tip of a small paring knife.  Fit a pastry bag with a 1/4-inch round tip and fill the bag with the matcha cream.  Pipe cream into puffs until each puff is fully filled.  Alternatively, you can slice the top off each puff and fill the bottom with matcha cream.
  3. Ideally, serve immediately.  You can store them in an airtight container in the fridge for up to 5-6 hours before serving.
  4. Leftover puffs can be stored in an airtight container in the fridge for a few days.  They won’t be crunchy, but they will still be delicious.

Indian Butter Chicken (Murgh Makhani)

P1090650

I recently made an impulse buy in the supermarket: Cook’s Illustrated‘s Recipes for Two issue.  Their Indian butter chicken dish is amazing.  Since I don’t have whole spices, I substituted ground spices.


Indian Butter Chicken (Murgh Makhani)
Adapted from Cook’s Illustrated Recipes for Two

Yield: 2 servings

For the rice:

  • 3/4 cup basmati OR jasmine rice
  • 1 – 2 tablespoons unsalted butter
  • 1/2 teaspoon cumin seeds OR just under 1/2 teaspoon ground cumin
  • 2 green cardamom pods, lightly crushed OR just under 1/4 teaspoon ground cardamom
  • 2 whole cloves OR just under 1/4 teaspoon ground cloves
  • 1 1/4 cups water
  • 1 half-inch cinnamon stick OR 1 teaspoon ground cinnamon
  • 1 bay leaf
  • 1/2 teaspoon table salt

For the chicken:

  • 2 tablespoons unsalted butter, cut into 4 pieces and chilled, divided
  • 1/2 onion, finely chopped
  • 3 garlic cloves, minced
  • 2 teaspoons grated fresh ginger
  • 1 serrano chile, stemmed, seeded, and minced OR a dash of chili powder
  • 1 1/2 teaspoons garam masala
  • 1/2 teaspoon ground coriander OR cumin
  • 1/4 teaspoon ground cumin
  • 1/4 teaspoon pepper
  • 3/4 cup water
  • 1/4 cup tomato paste
  • 1 1/2 teaspoons sugar
  • 1 teaspoon table salt, divided
  • 1/2 cup heavy cream
  • 1 pound boneless, skinless chicken thighs, trimmed (1 1/2 pounds is also fine)
  • 1/4 cup plain Greek yogurt (non-fat is fine)
  • 1 1/2 tablespoons chopped fresh cilantro, divided OR 3/4 tablespoon dried parsley


Make the rice:

  1. Put rice in a medium bowl, rinse a couple times with cold water, pour off as much water as you can, and set aside.
  2. Melt butter in a medium saucepan over medium heat.
  3. Add cumin, cardamom, and cloves and cook, stirring constantly, until fragrant, about 1 minute.
  4. Add rice and cook, stirring constantly, until fragrant, about 1 minute.  If using ground cinnamon, stir it in now.
  5. Add water, cinnamon stick if using, bay leaf, and salt and bring to a boil.
  6. Reduce heat to low, cover, and simmer until all water is absorbed, 13-15 minutes.  (Start checking around 10 minutes in case your stove runs hot.)
  7. Let stand, covered, off heat for at least 10 minutes.

Make chicken:

  1. Melt 1 tablespoon butter in medium saucepan over medium heat. Add onion, garlic, ginger, and serrano (if using) and cook, stirring frequently, until mixture is softened and onion begins to brown, 6-8 minutes.
  2. Add garam masala, coriander (if using), cumin, and pepper and cook, stirring frequently, until fragrant, about 3 minutes.
  3. Add water and tomato paste and whisk until no lumps of tomato paste remain.
  4. Add sugar and 1/2 teaspoon salt and bring to boil.
  5. Off heat, stir in cream.
  6. Using immersion blender or blender, process until smooth, 30-60 seconds.
  7. Return sauce to simmer over medium heat and whisk in remaining 1 tablespoon butter.
  8. Remove saucepan from heat and cover to keep warm. (Sauce can be refrigerated for up to 4 days; gently reheat sauce before adding hot chicken.)
  9. Adjust oven rack 6 inches from broiler element and heat broiler on the “high” setting.  Line a rimmed baking sheet with aluminum foil for ease of cleanup and set a wire rack in it.  (You want a rimmed baking sheet so the grease doesn’t slosh out when you move the sheet later.)
  10. Combine chicken, yogurt, and remaining 1/2 teaspoon salt in bowl and toss well to coat.
  11. Using tongs, transfer chicken to wire rack.
  12. Broil until chicken is evenly charred on both sides, 16-20 minutes, flipping chicken halfway through broiling.
  13. Remove baking sheet and let chicken rest for 5 minutes on the wire rack.
  14. While chicken rests, warm sauce over medium-low heat.
  15. Cut chicken into ¾-inch chunks and stir into sauce.
  16. Stir in 1 tablespoon fresh cilantro OR 3/4 tablespoon dried parsley.  Season with salt if desired (I didn’t think it needed it).
  17. If using fresh cilantro, sprinkle with remaining 1 1/2 teaspoons now.
  18. Finish the rice: Remove the cinnamon stick, bay leaf, and whole cardamom and cloves (if you used them) from the rice.  Fluff it with a fork.
  19. Serve butter chicken over rice.

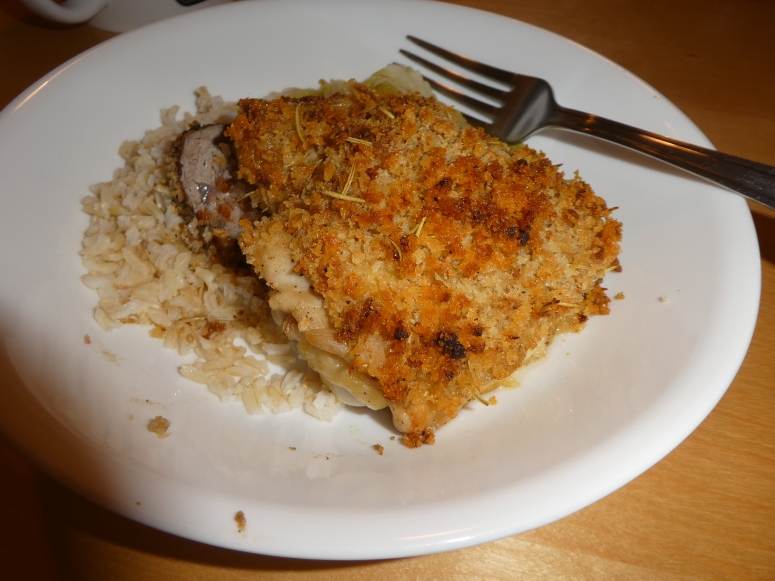
Crispy Garlic Rosemary Dijon Chicken

P1060511

I love roasted rack of lamb, but it’s more of a special occasion dish, so I adapted the topping to use on chicken instead.  It’s equally delicious and a lot simpler to make (not to mention cheaper).


Crispy Garlic Rosemary Dijon Chicken
Adapted from AllRecipes

Yield: 4 chicken thighs or 6 drumsticks

  • 4 bone-in chicken thighs OR 6 drumsticks
  • Salt, to taste
  • Black pepper, to taste
  • 1/2 cup fresh bread crumbs OR Panko bread crumbs
  • 2 tablespoons minced garlic
  • 2 tablespoons chopped fresh rosemary OR 1 teaspoon dried rosemary
  • 1/2 teaspoon salt
  • 1/4 teaspoon black pepper
  • 2 tablespoons olive oil
  • 1-2 tablespoons Dijon mustard, for brushing


  1. Center a rack in the oven and preheat to 400°F.  Line a baking sheet with aluminum foil for ease of cleanup and set aside.
  2. Sprinkle salt and pepper over each piece of chicken and rub them in.
  3. Prepare the topping: In a large bowl, combine bread crumbs, garlic, rosemary, 1/2 teaspoon salt, and 1/4 teaspoon pepper. Toss in olive oil to moisten mixture. Set aside.
  4. Dollop Dijon mustard onto each piece of chicken, brush it all over the skin, and coat with bread crumb mixture.
  5. Arrange drumsticks or thighs on baking sheet.
  6. Bake for 40 minutes.


Roasted Rack of Lamb

IMG_7512

Back in college, my close friend and cooking buddy found this rack of lamb recipe.  It has been one of my favorites ever since.  To remember him on his birthday, here it is.

Original recipe


Roasted Rack of Lamb
From AllRecipes

Yield: 4 servings

For the topping:


  • 1/2 cup fresh bread crumbs OR Panko bread crumbs
  • 2 tablespoons minced garlic
  • 2 tablespoons chopped fresh rosemary OR 1 teaspoon dried rosemary
  • 1/2 teaspoon salt
  • 1/4 teaspoon black pepper
  • 2 tablespoons olive oil

For the lamb:

  • 1 (7- or 8-bone) rack of lamb, trimmed and frenched, at room temperature (this is very important for the cooking time!)
  • 1 teaspoon salt
  • 1 teaspoon black pepper
  • 2 tablespoons olive oil
  • 1 tablespoon Dijon mustard


  1. Take rack of lamb out of refrigerator about 1 hour before you plan to cook.  Let it come to room temperature.  (This will make a big difference for the cooking time!)
  2. Center a rack in the oven and preheat to 450°F.
  3. Prepare the topping: In a large bowl, combine bread crumbs, garlic, rosemary, 1/2 teaspoon salt, and 1/4 teaspoon pepper. Toss in 2 tablespoons olive oil to moisten mixture. Set aside.
  4. Season the rack all over with salt and pepper.
  5. Heat 2 tablespoons olive oil in a large heavy oven-proof skillet over high heat.
  6. Sear rack of lamb for 1-2 minutes on all sides, holding it with a pair of long tongs. Don’t move the meat while searing.  The oil will sizzle and pop, so you might want to wear oven gloves.
  7. Transfer rack of lamb to a large plate and set aside for a few minutes.
  8. Pour excess oil out of the skillet to avoid too much smoking in the oven.
  9. Brush the bottom and sides of the rack of lamb with mustard, then roll in the bread crumb mixture until evenly coated.
  10. Transfer the rack of lamb back to the skillet, bone side down, brush the top with mustard, and gently pat bread crumbs onto it.
  11.  You can cover the ends of the bones with foil to prevent charring, although I usually skip this step.
  12. Roast the lamb for 12-18 minutes, depending on the degree of doneness you want.  I’ve found that 12 minutes gives me medium-rare in the middle and medium to medium-well on the ends. If you have a meat thermometer, you can take a reading in the center of the meat after 10-12 minutes and remove the meat, or let it cook longer, to your taste.  Allow internal temperature to be 5-10°F less than you like because the meat will continue to cook while it sits.  Bloody rare: 115-125°F.  Rare: 125-130°F.  Medium rare: 130-140°F.  Medium: 140-150°F.
  13. Let it rest for 5-7 minutes, loosely covered, before carving between the ribs.


Thumbprints for Us Big Guys

IMG_6708

These cookies remind me of butter cookies with a nutty flavor and a dollop of jam.


Thumbprints for Us Big Guys
Adapted from Dorie Greenspan’s Baking: From My Home To Yours

Yield: 60 cookies

  • 1 3/4 cups finely ground hazelnuts OR almond flour
  • 1 3/4 cups all-purpose flower
  • 16 tablespoons (2 sticks or 8 oz) unsalted butter, at room temperature
  • 1/3 – 1/2 cup sugar, depending on how sweet you want them
  • 1 teaspoon pure vanilla extract
  • 1/2 – 3/4 teaspoon pure almond extract
  • Confectioner’s sugar, for dusting (optional)
  • About 1 cup raspberry jam (or the jam or marmalade of your choice)


  1. Position the racks to divide the oven into thirds and preheat the oven to 350°F. Line two baking sheets with parchment or silicone mats.
  2. Working with a stand mixer, preferably fitted with the paddle attachment, or with a hand mixer in a large bowl, beat the butter and sugar together on medium speed until light and fluffy, 3 to 4 minutes.
  3. Add the extracts and beat to blend.
  4. Beat in the ground nuts.
  5. Reduce the mixer speed to low and gradually add the flour, mixing only until it is incorporated into the dough.
  6. Working with a teaspoonful of dough at a time, roll the dough between your palms to form small balls and place the balls 2 inches apart on the baking sheets.  Flatten them slightly and smooth together any cracks.
  7. Steadying each cookie with the thumb and forefinger of one hand, use the pinkie of your other hand (or the end of a wooden spoon) to poke a deep hole in the center of each cookie. Be careful not to go all the way down to the baking sheet.
  8. Bake for 15-18 minutes, rotating the sheets from top to bottom and front to back at the midway point. The cookies should be only slightly colored–they may even look underdone, which is fine: they should not be overbaked.
  9. When the cookies are baked, remove the baking sheets from the oven and let the cookies rest on the sheets for 2 minutes before transferring them to cooling racks with a wide metal spatula.  If desired, sift confectioner’s sugar over them.
  10. Repeat with the remaining dough, remembering to cool the baking sheets before baking the next batch.
  11. Bring jam to a boil in a small saucepan over low heat, or bring to a boil in a microwave oven; remove from the heat.
  12. Fill the indentations of all the cookies with enough of the hot jam to dome over the tops, because the jam will sink a little as it cools.
  13. Cool to room temperature before serving.
  14. To store: Wrapped well, the cookies will keep at room temperature for 3 days or in the freezer for up to 2 months.