Taiwanese-Style Apple Shortcakes

IMG_8418.JPG

A family friend took a pastry-making class and learned how to make Taiwanese pineapple shortcakes.  She subsequently gave me both the recipe and her molds.  The pastry crust is deliciously buttery; however, the premade pineapple filling that the original recipe calls for isn’t easy to find in the US.  I have adapted the shortcakes to use home-made caramelized apple filling.

Baking notes:

  • Special equipment: 20 2”x2” square molds, or molds of a similar size
  • If you happen to find premade pineapple filling, you can use that!  Just mix 14 oz of the pineapple filling with 0.5 oz butter before wrapping it into the pastry crust.


Taiwanese-Style Apple Shortcakes

Yield: 20 pineapple cakes

  • 5.5 oz unsalted butter, at room temperature
  • 1.5 tablespoons instant milk powder
  • 6 tablespoons powdered sugar
  • 1 egg yolk (if you triple the recipe, put in entire egg)
  • 2 cups cake flour OR 1 3/4 cups all-purpose flour+1/4 cup corn starch
  • 14 oz (400 g) caramelized apple filling


  1. Sift together instant milk powder and powdered sugar.
  2. In the bowl of a stand mixer fitted with a paddle attachment or in a large bowl with a hand mixer, cream together butter, instant milk powder, powdered sugar, and yolk on low speed.
  3. Add cake flour OR all-purpose flour+corn starch and knead by hand until it forms an evenly mixed ball of dough. It might be a little crumbly.
  4. Refrigerate in a plastic bag for 30 minutes.
  5. Preheat oven to 375°F. Spread 20 2” x 2” square molds or molds of a comparable size evenly across a large baking sheet.  You can line the sheet with aluminum foil for ease of cleaning.
  6. Divide filling into 20 equal pieces, gently pressing each into a solid little mound.  It’s easiest to divide by weight in units of grams.
  7. Remove dough from refrigerator and divide into 20 equal pieces. It is easiest to divide them by weight in units of grams.  Cover loosely with plastic wrap to prevent dough from drying out.
  8. Roll a piece of dough into a ball, and flatten it to a rough circle 3 inches in diameter between your palms.
  9. Place a piece of filling in the center of the dough circle and gently pinch the edges of the dough together, removing excess dough. Save it to patch up any tears in the shortcake.
  10. Roll into a smooth ball between your palms.
  11. Place each ball into a mold and press down gently with the palm of your hand until the shortcake fills the corners of the mold. They will not expand much while baking.
  12. Repeat with remaining dough and filling.
  13. Bake for 10 minutes, remove from oven, and flip over molds using two metal spatulas.
  14. Bake 10 more minutes with the tray rotated from its previous orientation, until shortcakes are light golden brown on top.
  15. Cool shortcakes on baking sheet until molds are cool enough to touch.
  16. Gently remove shortcakes from molds. Finish cooling on baking sheet or on wire rack.

Bacon Green Onion Steamed Buns

IMG_7498

These bacon green onion buns are soft and tender.  They’re also convenient because you can make them ahead of time, freeze them, and then steam to reheat when you want to eat them.


Bacon Green Onion Steamed Buns (Huajuan)
From Teacher Meng

Yield: 7 buns

For the filling:

  • 30 g bacon OR ham, chopped finely
  • 15 g white part of green onions, chopped finely
  • ¼ teaspoon ground pepper

For the dough:

  • 135 g cold water
  • 3/4 teaspoons (3 g) instant yeast (active dry yeast probably also works)
  • 250 g all-purpose flour
  • 15 g granulated sugar
  • 5 g flavorless oil (such as canola)
  • Extra flavorless oil for brushing


  1. If using bacon: Heat a small pan on low heat, then add bacon bits.  Cook until they are fragrant.  Remove from heat and stir in green onion and pepper.  Set aside to cool.
  2. In a large mixing bowl, stir together water and yeast. It’s okay if the yeast doesn’t dissolve entirely.
  3. Add flour, sugar, and oil.
  4. Stir together with a rubber spatula until all the liquid disappears. It will resemble a shaggy mess.
  5. With hands, knead the dough in the bowl until it comes together into a ball.
  6. Move dough to a work surface (which you do not need to flour) and continue to knead until the surface is soft and smooth. The dough should not stick to your hands or the work surface.
  7. Let the dough rest at room temperature for 5 minutes. Cover so it doesn’t dry out.
  8. Lightly flour a work surface and roll out dough into a 14”x7” rectangle. Lay it so the long side faces you.
  9. Brush surface of dough lightly with oil.
  10. Sprinkle filling evenly across surface of dough and lightly press it with your hands so it sticks to the dough.
  11. Fold the bottom third of the dough rectangle up, press lightly so it sticks, and brush lightly with oil. (It becomes an even skinnier rectangle.)
  12. Fold the top third of the dough rectangle down. Press lightly so it sticks.
  13. Using a serrated knife, cut the long, skinny dough into 7 strips that are 2.5 cm (just under 1 inch) wide, and 7 strips that are 2 cm (~0.8 inch) wide.
  14. Take one narrower strip and lay it on top of a wider strip. Lay a thin bamboo skewer along the center of the stack the long way, and then press down to stick all the layers together.  Don’t press so hard that you cut all the way through the dough.  If you don’t have a bamboo skewer, the non-sharp edge of a table knife or a coffee stir stick works just as well.
  15. Place each bun on a small piece of wax paper or a flattened cupcake liner.
  16. Arrange them in the steamers, cover with the lid, and let rise at room temperature for 20 minutes.
  17. Put cold water in the bottom pot and stack the steamers on top. If using metal steamers, wrap the lid with a kitchen towel so condensation doesn’t drip on the buns.
  18. Turn the heat to high and bring water to a boil.
  19. Once water is boiling, turn heat to medium-high and steam for 12 minutes.
  20. Remove pot-and-steamer arrangement from stove, crack lid open, and let sit for 3-5 minutes before removing lid entirely.
  21. To store: Cool buns completely. Place in Ziploc bag and freeze.

Black-and-White-Chocolate Cake

IMG_7557

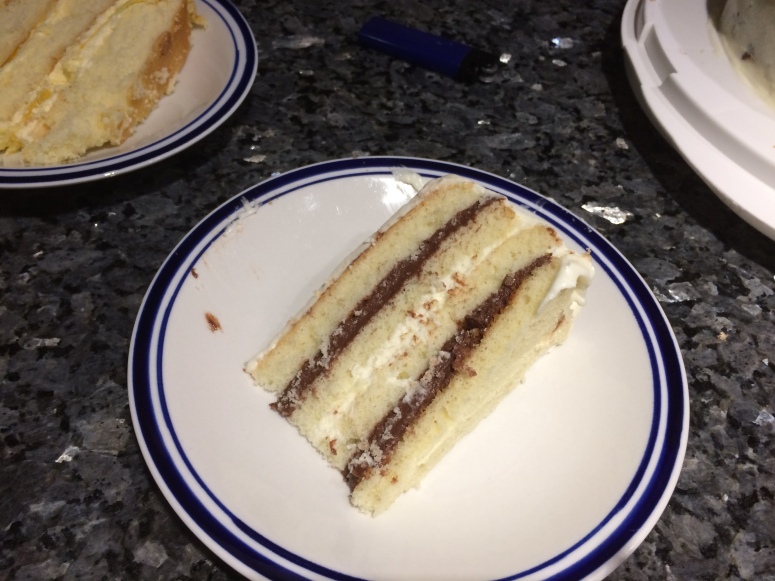
This is a double-chocolate birthday cake I made for a friend last summer.  It’s very good, but the portions are hard to scale down so it’s really more of a party cake.  I’m posting it as a sort of aspirational recipe, for when we can hold large celebrations again!


Black-and-White-Chocolate Cake
Adapted from Dorie Greenspan’s Baking: From My Home to Yours

Yield: 10 servings

For the Cake:

  • 2 cups cake flour OR 1 3/4 cups all-purpose flour+1/4 cup corn starch
  • 2 teaspoons baking powder
  • 1/8 teaspoon baking soda
  • 1/4 teaspoon salt
  • 10 tablespoons unsalted butter, room temperature
  • 1 cup sugar
  • 3 large eggs
  • 1 large egg yolk
  • 1 teaspoon pure vanilla extract
  • 3/4 cup buttermilk OR 1/4 cup plain Greek yogurt+1/2 cup milk

For the Dark Chocolate Cream:

  • 2 cups milk
  • 4 large egg yolks
  • 6 tablespoons sugar
  • 3 tablespoons cornstarch, sifted
  • 1/4 teaspoon salt
  • 7 oz bittersweet chocolate, melted
  • 2 1/2 tablespoons unsalted butter, cut into 5 pieces, at room temperature

For the White Chocolate Whipped Cream:

  • 6 oz premium-quality white chocolate (such as Valrhona Ivoire or Guittard), finely chopped
  • 1 1/2 cups heavy cream
  • Chocolate shavings or curls, dark or white or a combination, for decoration (optional)


Make the cake:

  1. Center a rack in the oven and preheat the oven to 350°F. Butter two 9 x 2 inch round cake pans, dust insides with flour, tap out the excess and line the bottoms of the pans with parchment or wax paper. Put the pans on a baking sheet.
  2. Sift together the cake flour OR all-purpose flour+corn starch, baking powder, baking soda, and salt.
  3. Working with a stand mixer, preferably fitted with a paddle attachment, or with a hand mixer in a large bowl, beat the butter on medium speed until soft and creamy.
  4. Add the sugar and beat for another 3 minutes.
  5. Add the eggs one by one, and then the yolk, beating for 1 minute after each addition. Beat in the vanilla; don’t be concerned if the mixture looks curdled.
  6. Reduce the mixer speed to low and add the dry ingredients alternately with the buttermilk, adding the dry ingredients in 3 additions and the milk in 2 (begin and end with the dry ingredients); scrape down the sides of the bowl as needed and mix only until the ingredients disappear into the batter.
  7. Divide the batter evenly between the two pans and smooth the tops with a rubber spatula.
  8. Bake for 28 to 30 minutes, rotating the pans at the midway point. When fully baked, the cakes will be golden and springy to the touch and a thin knife inserted into the centers will come out clean.
  9. Transfer the cakes to a rack and cool for about 5 minutes, then unmold, remove the paper and invert to cool to room temperature right side up on the rack.

Make the Dark Chocolate Cream (can make up to 3 days in advance):

  1. Bring the milk to a boil.
  2. Meanwhile, in a large heavy-bottomed saucepan, whisk the egg yolks with the sugar, cornstarch, and salt until thick and well blended.
  3. Whisking without stopping, drizzle in about 1/4 cup of the hot milk – this will temper, or warm, the yolks so they won’t curdle – then, still whisking, add the remainder of the milk in a steady stream.
  4. Put the pan over medium heat and, whisking vigorously, constantly and thoroughly (make sure to get into the edges of the pan), bring the mixture to a boil.
  5. Keep at a boil, still whisking, for 1 to 2 minutes.
  6. Remove the pan from the heat.
  7. Whisk in the melted chocolate, and let stand for 5 minutes.
  8. Then whisk in the pieces of butter, stirring until they are fully incorporated and the chocolate cream is smooth and silky.
  9. Press a piece of plastic wrap against the surface of the cream to create an airtight seal and refrigerate the cream until chilled, or for up to 3 days. Or, if you want to cool the cream quickly, put the bowl with the cream into a larger bowl filled with ice cubes and cold water and stir the cream occasionally until it is thoroughly chilled, about 20 minutes.

Make the white chocolate whipped cream:

  1. Put the white chocolate in a heatproof bowl and put the bowl over a saucepan of gently simmering water. Stir frequently to melt the chocolate evenly. Meanwhile, bring 1/2 cup of the heavy cream to a boil.
  2. When the white chocolate is melted, remove the bowl from the pan.
  3. Pour the hot cream into the melted chocolate and let it sit for a minute.
  4. Using a small spatula, stir the chocolate gently until it is smooth.
  5. Let it sit on the counter until it reaches room temperature – it can’t be the least bit warm when you add it to the whipped cream.
  6. Working with the stand mixer with the whisk attachment or with a hand mixer in a large bowl, beat the remaining 1 cup heavy cream only until it holds the softest peaks.
  7. Turn the machine to high, add the cooled white chocolate all at once, and continue to beat until the whipped cream holds firm peaks.
  8. Turn the whipped cream into a bowl, press a piece of plastic wrap gently against the surface to create an airtight seal, and refrigerate for at least 2 hours, or up to 6 hours.

Assemble the cake:

  1. If the tops of the cake layers have crowned, use a long serrated knife and a gentle sawing motion to even them.
  2. Slice each layer horizontally in half.
  3. Place one layer cut side down on a cardboard cake round or on a cake plate protected by strips of wax or parchment paper.
  4. Remove the dark and white chocolate creams from the refrigerator and whisk each of them vigorously to loosen and smooth them.
  5. With a long metal icing spatula, spread enough dark chocolate cream (about 1 cup) over the cake layer to cover it completely.
  6. Top the cream with another cake layer, cut side up, and cover this layer with white chocolate whipped cream, making the white layer about the same thickness as the dark layer.
  7. Cover with a third layer, cut side up, and cover with another cup of so of the dark chocolate cream. (You’ll have some dark chocolate cream left over – use it as a dip for madeleines or sables).
  8. Top with the final layer of cake, cut side down, and frost the sides and top with the remaining white chocolate whipped cream. If you’d like to decorate the top with chocolate shavings or curls, do it now.
  9. Refrigerate for at least 3 hours, or overnight.
  10. To serve, remove the cake from the fridge about 20 minutes before serving.  Use a serrated knife and gentle sawing motion to cut it.
  11. To store: Cover cake loosely and refrigerate, keeping it away from foods with strong odors.

Lemon Chewy Crisps

IMG_6729.JPG

These lemon cookies have great combination of a chewy interior and crispy edges.  They were among the first things I made when I was learning how to bake – and didn’t know that you really, really should not substitute baking soda for baking powder.  But I am happy to report that when you use all the proper ingredients, they taste great!


Lemon Chewy Crisps
Adapted from AllRecipes

Yield: 24-30 cookies


  • 1/2 cup butter, softened
  • 2/3 – 3/4 cup white sugar
  • 1 egg
  • 1 tablespoon lemon zest (or use the zest from the whole lemon for extra lemon flavor)
  • 1 1/2 teaspoons fresh lemon juice
  • 3/4 teaspoon vanilla extract
  • 1/2 teaspoon baking powder
  • 1/4 teaspoon baking soda
  • 1 1/4 cups all-purpose flour
  • 1/2 cup sliced almonds, optional


  1. Preheat oven to 350°F.  Line two baking sheets with aluminum foil for ease of clean-up.
  2. Beat butter and sugar in a large bowl with electric mixer on high speed until fluffy.
  3. Beat in remaining ingredients except flour until well blended.
  4. On low speed, beat in flour just until blended.
  5. Drop by rounded teaspoonfuls 1 1/2 inches apart on baking sheets. Sprinkle with  almonds, if desired.
  6. Bake 10 – 12 minutes until edges are lightly browned, rotating the baking sheets top to bottom and front to back halfway through.  These cookies will have a nicely browned edge if baked on a regular thin cookie sheet rather than a thick or insulated one.
  7. Cool on baking sheet for 1 minute before removing to wire rack to cool completely.
  8. Store in an airtight container at room temperature for up to one week.