Chocolate Marzipan Cookies

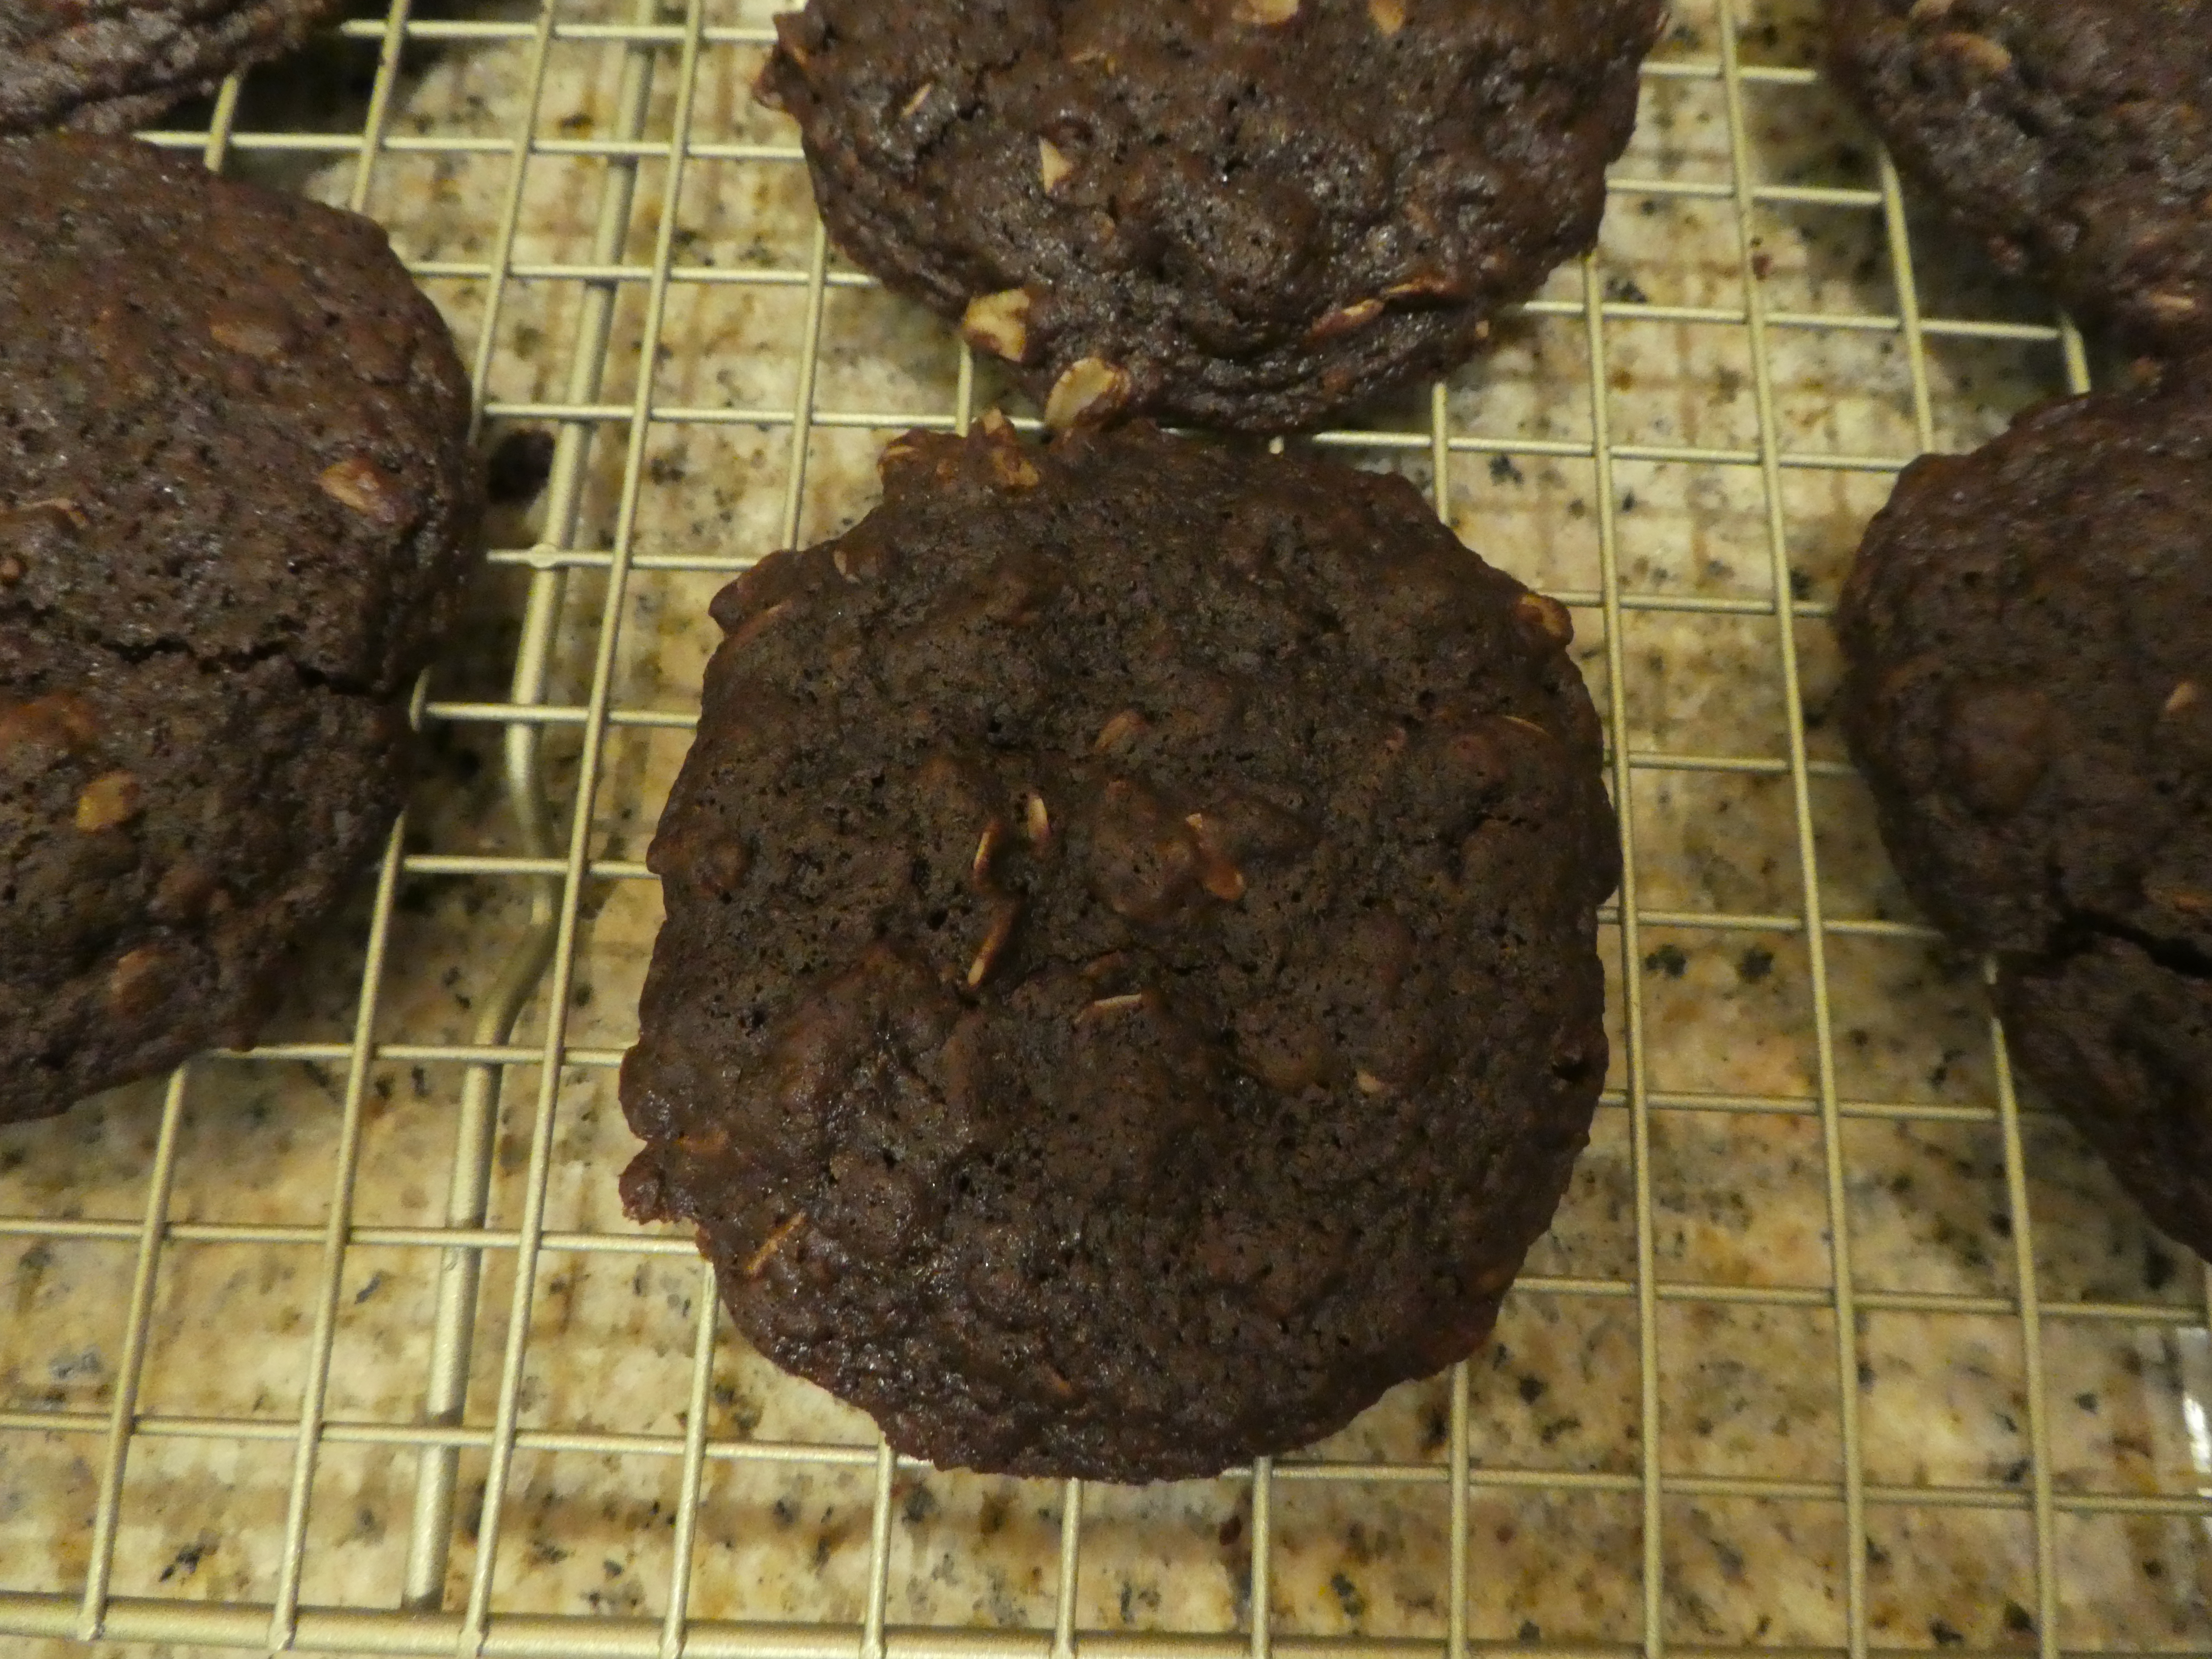
These cookies are sort of like chocolate chocolate chip cookies, except that instead of chocolate chips, you have chunks of marzipan! What more could you want, right?

Original recipe


Chocolate Marzipan Cookies
Adapted from Food.com

Yield: 36 cookies

  • 1/2 – 3/4 cup granulated sugar, depending on how sweet you want the cookies
  • 1/2 cup brown sugar OR 1/2 cup granulated sugar+dollop molasses
  • 1 (7 ounce) package marzipan, cut into chunks
  • 34 cup unsalted butter, softened
  • 2 teaspoons vanilla
  • 1 12  teaspoons baking powder
  • 12 teaspoon baking soda
  • 12 teaspoon salt
  • 1 large egg
  • 2 cups all-purpose flour
  • 12 cup unsweetened cocoa powder
  • Powdered sugar, for dusting (optional)

  1. Preheat oven to 350 degrees F. Line two baking sheets with parchment paper and set aside.
  2. In a large mixing bowl, or the bowl of a stand mixer, combine both sugars and the marzipan. Using a table knife or pastry cutter, cut marzipan into the sugar until the largest pieces are pea-sized.
  3. Add butter, vanilla, baking powder, baking soda, salt, egg, and molasses if using,.
  4. Use the stand mixer fitted with a paddle attachment or a hand mixer to beat until smooth, scraping down the bowl as needed, about 2 minutes.
  5. Add flour and cocoa powder and mix until incorporated, scraping down the bowl once during mixing, about 1 minute. The dough will be very stiff.
  6. Drop 1 tablespoon balls of dough on the prepared baking sheets, spacing them about 2 inches apart.
  7. Bake about 10 minutes, or until cookies are flat and have a crackled surface. Halfway through, rotate baking sheets top to bottom and back to front.
  8. The cookies will be very soft. Let them cool for 5 minutes on the baking sheet, then transfer to a rack to cook completely.
  9. If desired, once the cookies are cool, dust with powdered sugar.

Mocha Chip Cookies

Fresh out of the oven, these cookies are wonderfully crispy on the outside and chewy on the inside. The next day, they will still be deliciously chewy, plus the coffee flavor will have deepened.


Mocha Chip Cookies
Adapted from Pastry Love

Yield: 18 cookies

  • ½ cup unsalted butter, at room temperature
  • ½ cup brown sugar OR ½ cup white sugar + dollop molasses
  • 1 egg, at room temperature
  • ½ teaspoon vanilla extract
  • 2 tablespoons finely ground espresso OR coffee
  • ½ teaspoon baking soda
  • ¼ teaspoon salt
  • 1 cup + 2 tablespoons rye flour
  • 1 cup semisweet chocolate chips

Day 1: Make the dough

  1. In a stand mixer fitted with a paddle attachment, or in a large mixing bowl with a hand mixer, beat butter, sugar, and molasses (if using) on medium speed until light and fluffy, about 5 minutes.  Stop the machine and scrape down the sides a few times.
  2. Beat in eggs and vanilla on medium speed until fully combined, 1-2 minutes.  Scrape down the bowl from time to time.
  3. Beat in espresso OR coffee, baking soda, and salt.
  4. Add rye flour and stir in as much as you can by hand so it won’t fly out of the bowl.  Mix on low speed until fully combined.
  5. Stir in chocolate chips.
  6. Scrape dough into an airtight container and let it rest in the fridge overnight before baking.  You can store it in the fridge for up to 1 week.

Day 2: Shape and bake cookies

  • Preheat oven to 350 degrees F.  Line two large baking sheets with parchment paper or aluminum foil and set aside.
  • Use an ice cream scoop to scoop out the dough a few tablespoonsful at a time.  The dough will feel soft and sticky even straight out of the fridge, so try to work quickly.
  • Space the cookies 2-3 inches apart on the baking sheets and gently flatten them with your palm until they’re 1 to 1 ½ inches thick.
  • Bake 15 minutes, rotating the baking sheets front to back and top to bottom halfway through.  The cookies will be golden brown on the edges and slightly soft in the center.  Don’t let them get completely brown, because you want them to be slightly underbaked so they’re chewy in the middle.
  • Remove from oven and let them cool on the baking sheet for 5-10 minutes.  Then transfer them to a wire rack to cool completely.
  • Cookies can be stored in an airtight container at room temperature for up to 3 days.

Caramel Mocha Cookies

These cookies are a wonderful mixture of mocha flavor, plus sweetness from the caramel that balances out the bitterness of the coffee.


Mocha Caramel Cookies
From Teacher Meng

Yield: 16 cookies

For the cookies:

  • 3 teaspoons instant coffee OR espresso powder
  • ½ teaspoon water
  • 100 g unsalted butter, at room temperature
  • 60 g brown sugar
  • 100 g cake flour OR all-purpose flour
  • 50 g corn starch
  • ½ teaspoon baking soda
  • 1 teaspoon cocoa powder

For the topping:

  • 60 g granulated sugar
  • 4 teaspoons water, divided
  1. In a small bowl, stir together instant coffee OR espresso powder and water into a paste.  Set aside.
  2. In the bowl of a stand mixer fitted with the paddle attachment, or with a hand mixer in a large bowl, cream together butter and brown sugar on medium speed.
  3. Add coffee/espresso mix and beat on high speed until well combined.
  4. Beat in corn starch, baking soda, and cocoa powder.
  5. Add flour and beat just until it all disappears.  Do not overbeat.  You might want to finish mixing by hand.
  6. Using a rubber spatula, scrape the cookie dough into a ball, wrap in plastic wrap, and chill in the refrigerator for 30 minutes.
  7. Center a rack in the oven and preheat to 320°F.  Line a baking sheet with aluminum foil for ease of cleanup and set aside.
  8. Scoop out a piece of dough that weighs about 20 g and gently roll it into a ball between your palms.
  9. Place the ball on the baking sheet and press it until it is about 2” in diameter.
  10. Bake for 25 minutes.  Remove from oven and let cool directly on the baking sheet.
  11. While cookies are cooling, stir together granulated sugar and 2 teaspoons water in a small saucepan.  Cook over medium to medium-high heat until it turns into golden-brown caramel.
  12. Remove from heat and slowly add 2 teaspoons water, and stir in using a wooden spoon.
  13. Pour caramel onto the cookies to form a dollop in the center of each.

Pumpkin Spice Snickerdoodles

Pumpkin spice adds a festive, seasonal twist to these wonderfully soft and chewy snickerdoodles!

Baking notes:

  • You can turn these into normal snickerdoodles by omitting the cardamom, nutmeg, and cloves from the topping, and the zest or orange blossom water from the dough

Pumpkin Spice Snickerdoodles
Adapted from Food&Wine Nov. 2020 issue

Yield: 18-20 cookies

For the topping:

  • 2 tablespoons sugar
  • 1 tablespoon ground cinnamon
  • 3/4 teaspoon ground cardamom
  • 1/4 teaspoon ground nutmeg
  • 1/4 teaspoon ground cloves

For the cookie dough:

  • 1/2 cup unsalted butter, at room temperature
  • 1/2-2/3 cup sugar
  • 1 large egg
  • Zest of 1/4-1/2 of a clementine OR equivalent amount of orange zest OR 3/4 teaspoon orange blossom water
  • 1/2 teaspoon vanilla extract
  • 1/2 teaspoon baking soda
  • 1 teaspoon cream of tartar
  • Heaping 1/4 teaspoon salt
  • 1 cup + 1/4 cup + 2 tablespoons all-purpose flour
  1. Position racks in oven to divide into thirds, and preheat to 350 degrees F.  Line two large baking sheets with aluminum foil or parchment paper for ease of cleanup and set aside.
  2. In a small bowl, stir together topping ingredients.  (This makes too much, so I would put half of it in another small bowl to add as necessary when you’re actually coating the cookies.  Afterwards, you can store any leftovers in a covered container for the next time you make these cookies.)
  3. In the bowl of a stand mixer fitted with the paddle attachment, or in a large mixing bowl with a hand mixer, beat butter and sugar on medium-high speed until light and fluffy, about 4 minutes.  Scrape down the sides of the bowl periodically.
  4. Add egg, zest OR orange blossom water, and vanilla extract, and beat well.
  5. Beat in baking soda, cream of tartar, and salt.
  6. Add flour in 2 additions, beating on low speed just until fully incorporated, 30-45 seconds.  Don’t overbeat.
  7. Using a sturdy spoon, scoop out the dough and roll into 1-1/4” balls.
  8. Roll them in the topping mixture until fully coated.
  9. Space balls 3 inches apart on prepared baking sheets.
  10. Bake about 10 minutes, or until the outer edges start to set and wrinkle slightly.  Rotate the sheets top to bottom and front to back halfway through.  At the end, the cookies will have just set, and the tops will still feel soft when you pat them gently with a finger.  They won’t be fully cooked.
  11. Remove from oven and let cookies cool to room temperature on the baking sheets.  The residual heat will finish cooking them.
  12. The cookies can be stored in an airtight container at room temperature for up to 3 days.

Ossa dei Morti

Ossa dei morti are crunchy, chewy, airy almond cookies that taste like a cross between a cafe volcano cookie and a Chinese almond cookie.

Ossa dei Morti
Adapted from Pastry Love

Yield: 24 large cookies

  • 1 1/2 cups whole almonds
  • 2 large eggs, at room temperature
  • 1 large egg white, at room temperature
  • 1 1/4 – 1 3/4 cups sugar, depending on how sweet you want them
  • 1/2 teaspoon almond extract
  • 1 cup all-purpose flour
  • 1/2 teaspoon baking powder
  • 1/4 teaspoon salt
  1. Preheat a toaster oven to 325 degrees F. Spread almonds on the toaster oven tray and toast for 10-12 minutes, until they are light gold and start to smell nutty. Let cool, then roughly chop into large pieces either by hand or by pulsing in a food processor. Set aside.
  2. Position racks to divide oven into thirds and preheat to 325 degrees F. Line two large baking sheets with parchment paper or butter lightly. Set aside.
  3. In a stand mixer fitted with the whisk attachment, whip together whole eggs, egg white, sugar, and almond extract on medium-high speed for 6-8 minutes, until the mixture is thick and leaves a ribbon when you lift a spoonful and drop it back into itself. It’s okay if the ribbon disappears again fairly fast.
  4. In a separate small bowl, combine flour, baking powder, salt, and chopped almonds.
  5. Fold flour mixture into egg mixture until fully combined. The batter will be stiff and thick; you may need to finish mixing with your hands.
  6. Spoon the batter into 24 circles or oblongs on the baking sheets, spacing them 3 inches apart. The batter will get stiffer and and stiffer as it sits, so try to work quickly.
  7. Bake for 12-15 minutes, rotating the baking sheets back to front and top to bottom halfway through. The cookies will be light golden brown and completely baked through.
  8. Cool completely on the baking sheets on wire racks. Store airtight at room temperature for up to 2 weeks.

Lemon Chewy Crisps

IMG_6729.JPG

These lemon cookies have great combination of a chewy interior and crispy edges.  They were among the first things I made when I was learning how to bake – and didn’t know that you really, really should not substitute baking soda for baking powder.  But I am happy to report that when you use all the proper ingredients, they taste great!


Lemon Chewy Crisps
Adapted from AllRecipes

Yield: 24-30 cookies


  • 1/2 cup butter, softened
  • 2/3 – 3/4 cup white sugar
  • 1 egg
  • 1 tablespoon lemon zest (or use the zest from the whole lemon for extra lemon flavor)
  • 1 1/2 teaspoons fresh lemon juice
  • 3/4 teaspoon vanilla extract
  • 1/2 teaspoon baking powder
  • 1/4 teaspoon baking soda
  • 1 1/4 cups all-purpose flour
  • 1/2 cup sliced almonds, optional


  1. Preheat oven to 350°F.  Line two baking sheets with aluminum foil for ease of clean-up.
  2. Beat butter and sugar in a large bowl with electric mixer on high speed until fluffy.
  3. Beat in remaining ingredients except flour until well blended.
  4. On low speed, beat in flour just until blended.
  5. Drop by rounded teaspoonfuls 1 1/2 inches apart on baking sheets. Sprinkle with  almonds, if desired.
  6. Bake 10 – 12 minutes until edges are lightly browned, rotating the baking sheets top to bottom and front to back halfway through.  These cookies will have a nicely browned edge if baked on a regular thin cookie sheet rather than a thick or insulated one.
  7. Cool on baking sheet for 1 minute before removing to wire rack to cool completely.
  8. Store in an airtight container at room temperature for up to one week.


Thumbprints for Us Big Guys

IMG_6708

These cookies remind me of butter cookies with a nutty flavor and a dollop of jam.


Thumbprints for Us Big Guys
Adapted from Dorie Greenspan’s Baking: From My Home To Yours

Yield: 60 cookies

  • 1 3/4 cups finely ground hazelnuts OR almond flour
  • 1 3/4 cups all-purpose flower
  • 16 tablespoons (2 sticks or 8 oz) unsalted butter, at room temperature
  • 1/3 – 1/2 cup sugar, depending on how sweet you want them
  • 1 teaspoon pure vanilla extract
  • 1/2 – 3/4 teaspoon pure almond extract
  • Confectioner’s sugar, for dusting (optional)
  • About 1 cup raspberry jam (or the jam or marmalade of your choice)


  1. Position the racks to divide the oven into thirds and preheat the oven to 350°F. Line two baking sheets with parchment or silicone mats.
  2. Working with a stand mixer, preferably fitted with the paddle attachment, or with a hand mixer in a large bowl, beat the butter and sugar together on medium speed until light and fluffy, 3 to 4 minutes.
  3. Add the extracts and beat to blend.
  4. Beat in the ground nuts.
  5. Reduce the mixer speed to low and gradually add the flour, mixing only until it is incorporated into the dough.
  6. Working with a teaspoonful of dough at a time, roll the dough between your palms to form small balls and place the balls 2 inches apart on the baking sheets.  Flatten them slightly and smooth together any cracks.
  7. Steadying each cookie with the thumb and forefinger of one hand, use the pinkie of your other hand (or the end of a wooden spoon) to poke a deep hole in the center of each cookie. Be careful not to go all the way down to the baking sheet.
  8. Bake for 15-18 minutes, rotating the sheets from top to bottom and front to back at the midway point. The cookies should be only slightly colored–they may even look underdone, which is fine: they should not be overbaked.
  9. When the cookies are baked, remove the baking sheets from the oven and let the cookies rest on the sheets for 2 minutes before transferring them to cooling racks with a wide metal spatula.  If desired, sift confectioner’s sugar over them.
  10. Repeat with the remaining dough, remembering to cool the baking sheets before baking the next batch.
  11. Bring jam to a boil in a small saucepan over low heat, or bring to a boil in a microwave oven; remove from the heat.
  12. Fill the indentations of all the cookies with enough of the hot jam to dome over the tops, because the jam will sink a little as it cools.
  13. Cool to room temperature before serving.
  14. To store: Wrapped well, the cookies will keep at room temperature for 3 days or in the freezer for up to 2 months.

Chocolate Oatmeal Drops

P1000657

These chocolate oatmeal drops contain oats, so you can maybe almost convince yourself that they’re healthy….


Chocolate Oatmeal Drops
Adapted from Dorie Greenspan’s Baking: From My Home to Yours

Yield: About 50 cookies

  • 1 1/2 cups all-purpose flour
  • 1/2 cup unsweetened cocoa powder
  • 1/2 teaspoon baking soda
  • 1/2 teaspoon salt
  • 1/2 teaspoon ground cinnamon
  • 1 cup unsalted butter, cut into 16 pieces
  • 1 tablespoon water
  • 1 1/4 – 1 1/2 cups light brown sugar OR granulated sugar+dollop molasses, depending on how sweet you want it
  • 9 ounces bittersweet chocolate, coarsely chopped
  • 2 large eggs
  • 1 1/2 cups old-fashioned oats


  1. Position racks to divide oven into thirds and preheat to 350°F.  Line two baking sheets with parchment paper.
  2. Set a heatproof bowl over a pot of simmering water.  Add butter and sprinkle over 1 tablespoon water, then add brown sugar, followed by chocolate.  Stir occasionally, until it’s all just melted.  Don’t let the ingredients get so hot that that butter separates from the sugar and chocolate.  Don’t worry if the mixture looks grainy.  Alternatively, you can melt all the ingredients together directly in a small non-stick pot over low heat, stirring constantly to make sure the chocolate doesn’t burn.

  3. Remove from the heat and whisk in the eggs, one at a time; the mixture will look shiny.
  4. Whisk in cocoa powder, baking soda, salt, and cinnamon.
  5. Whisk in flour, stirring only until it disappears into the dough.
  6. Stir in oats.
  7. Drop the dough by tablespoonfuls onto the baking sheets, spacing 2 inches apart because the cookies spread a lot.
  8. Bake for about 12 minutes, rotating the baking sheets top to bottom and front to back halfway through.  The cookies will be dark around the edges and just slightly soft in the middle.
  9. Using a wide metal spatula, transfer cookies to a wire rack and cool to room temperature.  (If cookies are too soft to lift immediately, wait a minute and try again.)
  10. Repeat with remaining dough, cooling baking sheets between batches.
  11. To store, pack cookies airtight at room temperature for 2-3 days.  You can also freeze for up to 3 months.


Spiced Hot Chocolate Cookies

P1070787

This seems like a time for some comfort food, so what better than marshmallow-topped hot chocolate in cookie form?

Original recipe


Spiced Hot Chocolate Cookies
From Tasty.co

Yield: 12 cookies

  • ¾ -1 cup brown sugar OR white sugar+dollop of molasses
  • ¼ – ½ cup white sugar
  • 2 eggs
  • 1 stick butter
  • 4 oz unsweetened chocolate
  • 1 cup flour
  • ½ cup cocoa powder
  • 1 ¼ teaspoons baking soda
  • 1 tablespoon cinnamon
  • ½ teaspoon salt
  • 1 teaspoon chili powder
  • ¼ teaspoon cayenne pepper, optional
  • ½ cup chocolate chips
  • 12 large marshmallows


  1. Center a rack in the oven and preheat to 350°F. Line a cookie sheet with aluminum foil and set aside.
  2. In the bowl of a stand mixer fitted with the paddle attachment, or in a large bowl with a hand mixer, beat together brown sugar, white sugar, and eggs.
  3. In a small pot over low heat, melt the unsweetened chocolate and butter, stirring constantly. Set aside and allow to cool.
  4. Mix chocolate mixture into egg and sugar mixture.
  5. Add baking soda, cinnamon, salt, chili powder, cayenne pepper (if using), and cocoa powder, and mix thoroughly (you don’t want any cayenne pepper clumps!).
  6. Add flour and mix just until combined. The dough will be extremely thick and sticky.
  7. Using a sturdy wooden spatula, stir in the chocolate chips.
  8. With an ice cream scoop, scoop out 12 balls of dough (each ball will be roughly 2 inches across). Space them 1.5-2 inches apart on the baking sheet.  Flatten gently.
  9. Bake for 13 minutes. Remove baking sheet from the oven.
  10. Top each cookie with a large marshmallow.
  11. Set oven to broil on “high.”
  12. Broil for 30 seconds, checking frequently, until the marshmallows have just started to turn golden-brown.
  13. Remove tray immediately. The marshmallows will continue to darken outside of the oven.
  14. Store in an airtight container at room temperature. You can reheat the cookies in the microwave for 10 seconds to make the marshmallows gooey again.

Pecan Sandies

P1090189

These pecan sandies are buttery and delicate and amazingly addictive.

Baking Notes:

  • Fleming instructs you to make tiny triangular cookies, but I prefer them a little bigger
  • These cookies do contain a lot of butter, so if you have stomach problems, you may want to restrict your intake


Pecan Sandies
Adapted from Claudia Fleming’s The Last Course

Yield: 12 dozen 1-inch square cookies OR 24 dozen tiny triangles

  • 1 cup pecans
  • 1/4 cup + 1 3/4 cups all-purpose flour
  • 1 cup unsalted butter, softened
  • 2/3 cup confectioners’ sugar
  • 2 teaspoons vanilla extract
  • 1 teaspoon salt
  • 1/2 teaspoon baking powder
  • 2 tablespoons (25 grams) turbinado (raw) sugar (optional)


Toast the pecans:

  1. Preheat a toaster oven to 350°F.
  2. Spread the nuts out in one layer on the toaster tray and bake them, stirring occasionally, until they are well browned, 10 to 13 minutes (they will smell toasted and nutty and look almost burned, but don’t worry about that).
  3. Transfer the tray to a wire rack to cool.

Make the cookies:

  1. In a food processor, grind the nuts with 1/4 cup flour until the mixture has the consistency of coarse sand.  Set aside.
  2. In the bowl of a stand mixer fitted with the paddle attachment, or using a hand mixer, beat the butter and sugar until creamy and smooth, about 2 minutes.
  3. Add the vanilla and beat well.
  4. Beat in salt and baking powder.
  5. Add 1 3/4 cups of flour, and mix just until combined.
  6. Stir in the nut mixture.
  7. Form the dough into a rectangle, wrap in plastic wrap, and chill for at least 3 hours.
  8. Preheat the oven to 325°F.
  9. Roll the dough between two sheets of wax paper to 3/16 inch thick (a rectangle approximately 10 x 14 inches).  I haven’t tried this myself, but according to Smitten Kitchen, you can freeze the dough between wax sheets to use later.
  10. Using a sharp knife, cut the dough into 1-inch squares.  If desired, you can further cut the squares on a diagonal into triangles.
  11. If desired, sprinkle the cookies with the turbinado sugar.
  12. Space cookies 1/2-1 inch apart on ungreased cookie sheets (do not reroll the scraps).  They will not expand much.
  13. Prick the cookies with a fork and bake until pale golden all over, about 10-11 minutes.
  14. Cool on a wire rack.  Alas, these cookies actually taste better if you let them cool first, and certainly hold together better, so you should actually wait.
  15. Store in an airtight container at room temperature.